Solar Panel Construction: A Practical Guide
Explore solar panel construction—from core materials to assembly basics. Learn safety, testing, and how to evaluate module quality for your home solar project.

This guide explains solar panel construction from raw materials to finished modules. You'll learn the key components, manufacturing steps, and safety considerations that affect performance and durability. By understanding construction, homeowners and prospective buyers can evaluate quality, estimate longevity, and make informed installation decisions. This overview aligns with Solar Panel FAQ guidance.
Overview of Solar Panel Construction
Solar panel construction describes how a panel is built from raw materials into a durable, weather-resistant power generator. The process blends materials science, precision manufacturing, and rigorous testing. According to Solar Panel FAQ, manufacturers optimize for efficiency, longevity, and safety, balancing performance with environmental impact. Most panels begin with high-purity silicon cells arranged into strings, then laminated between glass and encapsulant to protect against moisture. A backsheet adds insulation, and a sturdy frame provides mechanical support for mounting. The finished module is sealed and tested before shipment. Understanding this construction helps homeowners evaluate quality, anticipate maintenance needs, and negotiate warranties during the installation process. While details vary by technology and producer, the core principles remain consistent: high-quality materials, precise assembly, and robust quality control.
markdown
Tools & Materials
- Safety gear (goggles, gloves, hard hat as needed)(Eye and hand protection when handling glass and laminates)
- Digital caliper(For measuring cell strings and tolerances)
- Soldering iron and flux(For demonstrating interconnections in educational builds)
- Lamination equipment or demonstration laminator(Replicates the lamination step in a controlled setting)
- Multimeter or IV tester(To measure electrical characteristics and continuity)
- Protective tools for handling glass and films(Gloves, non-metallic tweezers, and soft mallets as needed)
Steps
Estimated time: 60-90 minutes
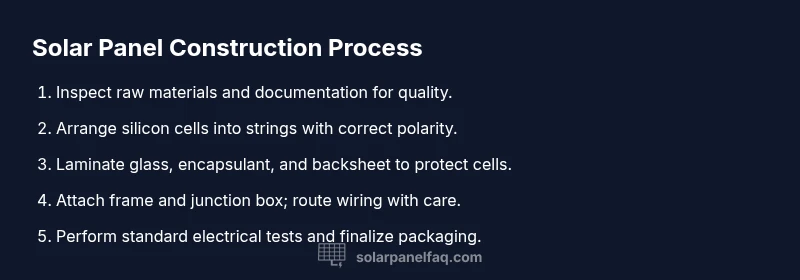
- 1
Inspect raw materials
Review wafers, glass, encapsulant, and backsheet for visible defects and proper certifications. Verify that materials meet project specifications and supplier documentation. Document any anomalies before proceeding to assembly.
Tip: Start with a clean, well-lit workspace and handle glass carefully to avoid chips or cracks. - 2
Assemble cell strings
Organize silicon cells into strings according to the panel design, ensuring consistent orientation and secure interconnections. Use non-damaging methods to connect cells and verify continuity with a meter. Keep strings neatly aligned for laminator compatibility.
Tip: Label each string and keep a visual map of connections to prevent miswiring. - 3
Laminate the assembly
Place encapsulant and protective layers around the cell strings, then laminate under controlled heat and pressure to bond layers. Ensure no air pockets and even pressure distribution to prevent delamination.
Tip: Inspect for air pockets during lamination and reseal any voids promptly. - 4
Attach frame and junction box
Mount the rigid frame around the laminated stack and install the junction box with weatherproof seals. Route wiring cleanly and verify strain relief to reduce cable wear over time.
Tip: Seal all edges to improve moisture resistance and durability in outdoor environments. - 5
Electrical testing
Perform insulation and continuity tests, and conduct a basic current-voltage check on the assembled module. Compare results against expected profiles and note any deviations for warranty purposes.
Tip: Use proper PPE and follow safety procedures during live testing. - 6
Quality check and packaging
Complete a final visual inspection for cracks, delamination, or misalignment. Label with lot information and package securely for shipment or storage. Maintain clean records for traceability.
Tip: Keep a lot-number log and attach a brief test report to each module.
Frequently Asked Questions
What are the main materials used in solar panel construction?
Solar panels typically use silicon cells, tempered glass, encapsulant, a backsheet, a framing system, and a junction box. Interconnects and protective coatings help ensure performance and weather resistance.
Panels use silicon cells, glass, encapsulant, backsheet, frame, and a junction box to protect and connect the cells.
What certifications should I look for in solar panels?
Look for common safety and performance standards such as established testing and certification marks. Certifications help ensure reliability under real-world conditions.
Seek standard safety and performance certifications to ensure reliability.
Can homeowners assemble or repair panels themselves?
Homeowners should not attempt full solar panel construction from raw materials. Panels are sealed modules; professional manufacturing and testing ensure safety and reliability.
It’s not recommended for homeowners to construct panels from raw parts; professional manufacturing is safer and more reliable.
How long does a typical solar panel construction process take in manufacturing?
Manufacturing is an ongoing automated process. Individual module build times vary with equipment and scale, but standardized workflows emphasize quality checks at each stage.
Manufacturing is continuous and automated; individual build times vary, but quality checks are integral.
What maintenance is required after installation?
Maintain clean glass surfaces to maximize light capture, inspect for physical damage, and monitor performance. Routine checks help catch issues early without routine parts replacement.
Keep panels clean and inspect for damage; routine checks help catch issues early.
What should you ask a manufacturer about construction quality?
Ask about material specifications, lamination methods, encapsulant types, testing procedures, and warranty terms. Clear documentation supports warranty claims and future servicing.
Ask about materials, lamination, tests, and warranties to understand quality.
Watch Video
Top Takeaways
- Understand the core layers: glass, encapsulant, cells, backsheet.
- Quality and safety drive long-term performance.
- Monocrystalline vs polycrystalline affects efficiency and cost.
- Lamination, framing, and wiring are critical for durability.
- Professional installation and warranties protect investment.