Steps to Install Solar Panels: A Complete Home Guide
A comprehensive guide to the steps to install solar panels on a home, covering planning, safety, permits, installation steps, electrical considerations, and ongoing maintenance for homeowners.

Learn how to install solar panels on a typical home roof, including planning, safety, permits, and basic wiring concepts. This guide covers roof suitability, system sizing, and post-install maintenance. For homeowners, you’ll learn the steps, required tools, and when to hire a pro. It also explains common mistakes and cost considerations, with practical tips for reducing risk.
Benefits and outcomes of a well-executed installation
Taking the steps to install solar panels on your home isn’t just about adding panels; it’s about shaping your energy future. A well-planned installation improves energy independence, reduces utility bills, and can enhance home value. When done correctly, you gain reliable power during peak sun hours, and you create a long-term asset for your property. The Solar Panel FAQ team emphasizes planning, safety, and informed decision-making to maximize these benefits, which is why this guide walks you through each stage with practical, homeowner-focused guidance.
According to Solar Panel FAQ, investing time in upfront planning reduces surprises during installation and helps you avoid costly rework. By aligning your system with your household consumption, you’ll see better performance and longer equipment life. This section begins with a clear sense of purpose: you’re not just mounting panels—you’re crafting a resilient energy future.
Site assessment and roof readiness
Before any mounting starts, evaluate roof condition, orientation, and shading. Ideal orientation is south-facing in the Northern Hemisphere, with minimal shading from trees or nearby structures. Check roof age and material to determine if it can support the additional load; if you’re near the end of a roof’s life, you may prefer to replace it before installing solar. Structural integrity matters: loose or damaged shingles, rotten rafter tails, or soft spots require attention before attachment. Don’t forget to verify attic ventilation and inspect for potential leaks that could worsen after exposure to wind and weather. If your roof is flat, you’ll plan for a ballast or ballast-free mounting system; for pitched roofs, you’ll consider mounting rails and flashing. This planning step reduces risk and helps you choose a system that fits your roof topology.
If you’re unsure about roof structure, consult a licensed professional early in the process. Solar Panel FAQ emphasizes collaboration with a qualified contractor to confirm load-bearing capacity and ensure code compliance. By documenting roof condition and shading patterns, you’ll make smarter decisions about panel placement and performance.
System sizing, components, and layout
System sizing is about matching your energy needs with what solar can supply. Start by examining your current electricity usage (kWh per month) and evaluating shading throughout the day. From there, choose the number of panels that fits your roof area and budget, keeping in mind that more panels increase production but also demand more mounting hardware and wiring. Components include mounting rails, panels, inverters (string or micro), optimizers if used, combiner boxes, junction boxes, conduit, and safety disconnects. Plan the electrical layout with practical routing of DC wiring to the inverter and AC output to your panelboard, ensuring clearances and access for maintenance. A well-drawn layout minimizes cable runs and maximizes airflow for cooling.
The Solar Panel FAQ team notes that decision-makers should consider future expansion and battery storage plans if you want off-grid flexibility or higher self-consumption. While many homeowners start with a grid-tied system, you can plan for add-ons later, such as a storage solution that aligns with local incentives and utility interconnection rules.
Tools, safety gear, and preparation
Safety is non-negotiable in any solar installation. Gather essential PPE: hard hat, non-slip shoes, eye protection, and gloves. A fall-arrest system or harness is advised for roof work, and make sure you have proper fall protection anchors. Tools you’ll likely need include a cordless drill, torque wrench, screwdrivers, utility knife, wire cutters/strippers, multimeter, and a conduit bender if you’re routing electrical conduit. Other critical items are weatherproof flashing, sealant, a mounting kit compatible with your roof type, and a fire-stop material near the electrical disconnect. Have a clear, weather-safe workspace; ensure ladders are stable and two-person lift points are available for heavy components. Always follow local codes and manufacturer instructions to avoid voiding warranties.
Pro tip: perform a pre-install safety briefing with all involved workers, outline roles, and verify that emergency contacts and a first-aid kit are available onsite. The goal is to prevent accidents and ensure efficient work during handsome sunlight windows.
Step-by-step overview for a typical residential install
This section provides a concise view of the main actions you’ll perform in sequence. It is not a substitute for the full step-by-step guide, but it helps you understand the workflow before you begin. Typical stages include securing roof anchors, mounting rails or racks, attaching panels to rails, wiring DC circuits to an inverter or micro-inverters, running conduit to the electrical panel, installing a disconnect, and finally performing commissioning tests. Expect weather considerations and utility coordination to influence timing and sequencing.
Remember, this overview is for planning and understanding; follow the detailed steps in the dedicated STEP-BY-STEP section to complete the project safely and legally.
Electrical interconnection, inverters, and grid tie considerations
Grid interconnection involves synchronizing the solar output with your utility’s distribution system. Inverter selection (string versus micro-inverters) affects performance under shading and panel mismatch. Ensure DC wiring runs are properly protected, fused, and terminated; AC wiring should pass through a proper disconnect and meet code requirements. A robust safety margin and correct grounding are essential for protecting people and equipment. Always obtain the necessary electrical permits and have your installation inspected by a qualified professional to verify that the interconnection complies with local utility standards.
If you plan to add storage later, consider how the inverter and wiring will handle increased current or changes in configuration. This foresight helps avoid costly retrofits and keeps your system aligned with code changes over time.
Permits, inspections, and incentives
Most installations require some form of permitting, including a building permit and an electrical permit, followed by a utility interconnection agreement. Local rules vary; your contractor or local building department can provide specifics. Incentives and rebates may be available at federal, state, or local levels, and some programs require producing certain documentation or attending an inspection. Maintaining good records of equipment specs, serial numbers, and warranties will help during inspections and when applying for incentives. Always plan for inspection windows and potential compliance issues before purchasing equipment or scheduling installation.
Solar Panel FAQ emphasizes checking eligibility for incentives early in the planning process to maximize savings and avoid surprises in the final steps.
Maintenance, warranties, and long-term care
Ongoing care is essential for maximizing system life and performance. Clean panels as needed to remove dust, pollen, or bird droppings; avoid abrasive cleaners that could scratch the glass. Regular inverter checks, monitoring the system’s output, and ensuring wiring remains undamaged by weather or pests help sustain performance. Keep a maintenance log and review warranty terms for modules, mounting hardware, and inverters. Schedule professional inspections every few years or as recommended by the manufacturer. A well-maintained system delivers reliable energy and shields you from unexpected downtime.
Tools & Materials
- Ladder with stabilizers(Stable base, extendable height to reach roof safely)
- Safety harness and lanyard(Use with roof anchors; ensure proper fit)
- Roof anchors and flashing kit(Match roof type; seal flashing to prevent leaks)
- Cordless drill and impact driver(Variable speed; use torque settings recommended by mounting kit)
- Torque wrench(Proper torque for mounting hardware)
- Measuring tape, level, and marker(Accurate placement and alignment)
- Wire cutters/strippers, crimp tool(DC and AC wiring tasks)
- MC4 connector tools and spare connectors(Secure DC connections)
- Mounting rails or racking system(Roof-compatible and wind-rated)
- Solar modules (panels) and mounting hardware(Spec sheets should match load and shading plans)
- Inverter (string or micro-inverters)(Match with system design; read manual)
- Conduit, junction boxes, and weatherproof seals(Protects wiring and keeps weather out)
- DC disconnect switch and AC shutoff(Code-required safety devices)
- Weatherproof sealant and flashing tape(Waterproof seals around penetrations)
- Multimeter and voltage tester(For safety checks and confirmation)
- Personal protective equipment (gloves, eye protection)(Protective gear at all times)
- Documentation folder with warranties and permits(Carry during inspections and future resale)
- Pencil and clipboards for plan sketches(Helpful for layout mapping)
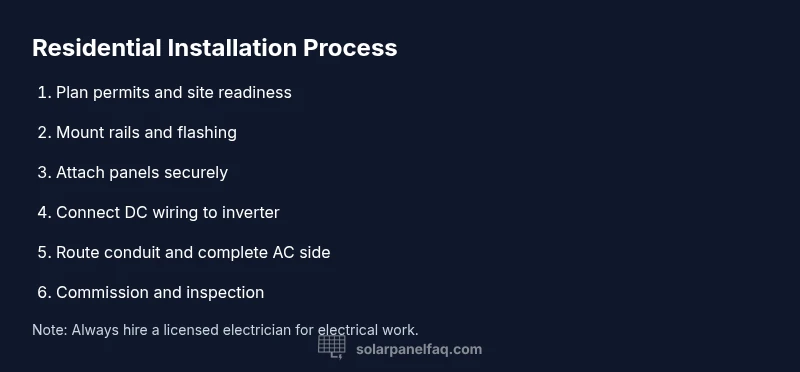
Steps
Estimated time: several hours to a full day, depending on system size and roof complexity
- 1
Assess roof and site readiness
Inspect roof condition, orientation, and shading. Confirm that the roof can bear the added load and that there is a clear path for cable routing to the main electrical panel.
Tip: Document roof areas with photos and a simple sketch before starting. - 2
Plan system layout and interconnection
Draft a layout for panel placement, rack alignment, and cable routes. Decide on inverter type and whether you’ll add storage later, ensuring future expansion is feasible.
Tip: Create a scale drawing or use software to verify fit and spacing. - 3
Obtain permits and coordinate with utility
Contact local building and electrical departments to obtain necessary permits. Submit interconnection paperwork and schedule inspections as required by your utility.
Tip: Ask for a checklist from the authority to avoid missing documents. - 4
Prepare mounting hardware and safety gear
Unbox and inventory mounting components. Inspect all items for damage, and prepare safety gear for use on the roof.
Tip: Test-fit rails on the ground first to minimize on-roof adjustments. - 5
Install mounting rails and flashings
Secure rails to rafters or the roof deck using anchors and flashing to prevent leaks. Ensure rails are level and aligned with planned module positions.
Tip: Work methodically, tightening fasteners to recommended torque. - 6
Mount solar modules
Attach panels to rails using appropriate clamps or hardware. Leave space for thermal expansion and ensure electrical clearances are observed.
Tip: Avoid stepping on panels; use designated walk paths or platform. - 7
Connect DC wiring and inverter
Route DC cables to combiner boxes and the inverter. Install conduit and weatherproof seals, then connect to the electrical panel with the required disconnects.
Tip: Double-check polarity and verify continuity before powering up. - 8
Test, inspect, and commission
Power up the system, monitor output, and verify that all safety and interconnection requirements are met. Obtain inspection sign-offs and keep documentation.
Tip: Run a full-function test and document results for warranties.
Frequently Asked Questions
Do I need a professional to install solar panels?
Electrical work and interconnection with the utility typically require a licensed professional and permits. Some planning and non-electrical tasks can be done by homeowners, but consult local rules and a pro for safety and code compliance.
Electrical work usually needs a licensed professional and permits. For safety and code compliance, consult a pro.
What permits are required to install solar panels?
Most jurisdictions require a building permit and an electrical permit, plus an interconnection agreement with your utility. Requirements vary by location, so check with your local building department.
You’ll likely need building and electrical permits, plus utility interconnection paperwork.
How long does a typical residential installation take?
A typical installation spans several hours to a couple of days, depending on roof size, complexity, and scheduling with the utility. A professional crew can accelerate the process.
Most installations take a few hours to a couple of days, depending on the roof and permits.
Will installing solar panels damage my roof?
If mounted correctly with flashing and proper sealing, damage risk is minimized. Improper mounting or poor sealing can cause leaks; always follow manufacturer instructions and code requirements.
When done right with proper flashing and sealing, roof damage is unlikely.
Can I get tax incentives or rebates for solar panels?
Incentives vary by location and program. Check federal, state, and local options, and keep documentation ready for rebates or net-metering programs.
There are often incentives, but they vary by location; check local programs.
Is my roof type a barrier to installation?
Most common roof types support solar installations with the right mounting hardware. Some materials or configurations may require specialized mounting or roof replacement before installation.
Most roofs can be fitted with solar installations with the right hardware.
Top Takeaways
- Plan thoroughly before work begins.
- Check roof suitability and structure early.
- Use proper safety gear and follow local codes.
- Obtain permits and coordinate with your utility.
- Document, maintain, and inspect for long-term performance.