How to Use a Solar Panel to Power Lights Safely
Learn how to power lights with a solar panel, including component choices, wiring, safety, and testing for off-grid setups. A practical guide for homeowners seeking clean, reliable lighting.

A small solar panel to plug lights into can illuminate a shed or balcony with quiet, clean power. This quick guide shows a safe, simple path from panel to lights using a charge controller and a battery (or direct DC connection for very low power). No grid required for basic LED lighting.
Understanding the concept: solar panel to plug lights into
If you want a compact, off-grid lighting solution, a solar panel to plug lights into offers a practical path. This approach typically uses a small solar panel, a charge controller, and one or more LED lights. You can wire the lights directly to the controller in some cases, or store energy in a battery for nighttime use. The essential idea is to regulate voltage and prevent backflow so the lights receive stable power without damaging components. According to Solar Panel FAQ, powering lights with a compact solar setup is a practical off-grid solution for gardens, sheds, and balconies.
Key components and how they fit together
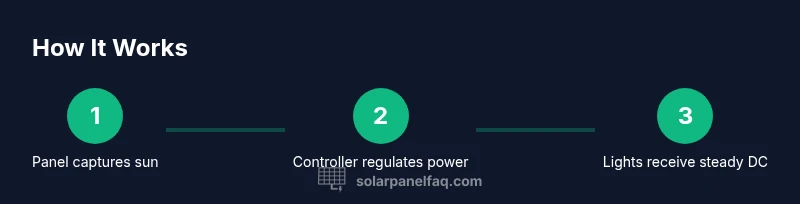
A safe solar lighting system relies on a few core parts that work in harmony. The solar panel captures sunlight and converts it to electrical energy. A charge controller manages the energy flow, protecting batteries and lights from voltage spikes. If you choose a storage-based design, a 12V or similar battery stores energy for use after sundown. Finally, the lights themselves are matched to the system's voltage and current, typically LED fixtures designed for DC operation. For direct DC use, some LED strings can run off the panel's output when it stays within a safe voltage window. Keeping these components compatible is essential to avoid overcharging, overheating, or voltage mismatch.
Sizing your system for LED lighting
Sizing is about matching daytime energy production to nighttime energy use. Start by estimating how many watts your LED fixtures draw and for how many hours you plan to run them each day. Then select a panel that can meet that daytime energy generation, and a controller that can handle the voltage and current. If you plan to add a battery, choose one with enough capacity to cover the expected overnight load. Remember that factors like shade, panel orientation, and temperature affect performance, so plan with a buffer. A well-sized setup reduces the risk of lights flickering or dimming at dusk.
Direct DC vs battery-based setups: pros and cons
Direct DC connections from a solar panel to LED lights are simple and have fewer components to manage. They work best for very small, low-wattage loads in sunny conditions and require lights that tolerate the panel's voltage. Battery-based systems, while more complex, offer consistent power after sunset and reduce the risk of voltage surges. They also enable longer lighting periods on cloudy days. The trade-offs include cost, maintenance, and space for batteries. Always design for safe voltage levels and incorporate protection such as fuses and proper connectors.
Wiring basics and safety considerations
Safety begins with correct wiring from panel to controller, to battery (if used), and finally to the lights. Use correct wire gauge for the length of runs and install fuses close to the battery or panel. Keep all connections covered in weatherproof enclosures and use cable glands to seal entries through walls or panels. Observe polarity carefully; reversing polarity can damage LEDs or the controller. Ventilate battery compartments if you use stored energy, and never mix high-voltage mains wiring with DC lighting circuits.
Installation workflow: from sun to light
A practical workflow starts with choosing a sunny mounting location for the panel, ideally facing true south (in the northern hemisphere) or north (in the southern hemisphere) with minimal shade. Mount the panel securely and route wires to a sheltered, accessible junction box. Install the controller in a dry, cool spot, wire in the battery if using storage, and connect lights last. After wiring, perform a low-power test in daytime to verify voltage and brightness, then observe performance through a full sunny day to confirm stability.
Maintenance, troubleshooting, and common questions
Regular checks keep a solar-powered lighting setup reliable. Clean the panel surface to maximize energy capture, inspect wires for wear, and verify connectors for corrosion. If lights flicker, recheck connections and ensure the controller is not shutting down due to overcurrent. If the system seems underpowered, revisit sizing and consider a larger panel or battery with a higher capacity. For more guidance, consult reputable manuals and the Solar Panel FAQ resources.
Real-world scenarios and tips
In a balcony garden, a small 10W panel with a compact 12V battery can comfortably power a string of warm LED lights for several hours on a sunny day. For a shed workspace, an integrated panel and battery setup can provide continuous illumination throughout the evening. Always verify that your chosen lights are rated for DC operation and that any adapters or converters are rated for the total current you expect. Solar Panel FAQ analysis shows that storage improves nighttime reliability, especially in environments with variable sunlight; plan accordingly for cloudy days and seasonal changes.
Tools & Materials
- 12V LED lighting fixtures(Low-watt, DC-powered LEDs designed for 12V or compatible with the regulator)
- Solar panel (5–20W for small setups)(Choose based on expected daytime energy needs)
- Charge controller(Must match system voltage and battery type)
- Battery (12V deep-cycle or AGM)(Optional for storage-based setups)
- DC-DC regulator (if needed)(Regulates panel/battery output to match lights)
- Wiring (14–18 AWG or heavier as needed)(Use appropriate gauge for run length)
- Fuses and fuse holder(Protect circuits near the battery or panel)
- Blocking diode(Prevents battery discharge back into panel)
- Weatherproof connectors and enclosures(Weatherproofing for outdoor use)
Steps
Estimated time: 2-4 hours
- 1
Assess lighting needs
Identify how many LED fixtures you’ll run, their total watts, and desired operating hours. This informs panel size, controller choice, and whether storage is necessary.
Tip: Document specs and sketch a simple load chart for quick reference. - 2
Select panel, controller, and battery
Choose a panel capable of meeting daytime energy needs and a controller that supports your system voltage. If you want nighttime use, add a compatible 12V battery and ensure the controller handles charging from the panel to the battery.
Tip: Match voltage ratings across components to avoid overvoltage or under-voltage conditions. - 3
Decide on storage vs direct drive
If you require reliable lighting after sunset, plan a storage-based path with a battery. For very small, daytime-only loads, a direct DC connection can work if lights tolerate panel voltage.
Tip: Never bypass the controller when using a battery; it protects both lights and batteries. - 4
Wire the system correctly
Run panel to controller, controller to battery, and battery to lights. Use fuse near the battery, maintain correct polarity, and keep connections in weatherproof enclosures.
Tip: Double-check polarity with a multimeter before powering on. - 5
Add protective components
Install a diode to prevent night-time discharge and place a fuse in line with the battery to protect against short circuits. Use appropriate connectors and weatherproofing.
Tip: Label all wires and keep spare fuses handy. - 6
Test during daylight
Power the system with sun and verify that lights reach intended brightness. Check for overheating, flicker, or controller shutoffs.
Tip: Monitor voltage at the battery terminal during start-up to ensure stable operation. - 7
Mount components securely
Mount the panel in a sunlit location, angle for seasonal sun, and secure all wiring. Place the controller and battery (if used) in a dry, accessible spot.
Tip: Use cable clips and weatherproof housings to minimize wear and tear. - 8
Maintain and optimize
Regularly clean the panel surface, inspect connectors for corrosion, and adjust panel angle as seasons shift. Reassess load if you add new lights.
Tip: Schedule routine checks—quarterly or after heavy weather—for best results.
Frequently Asked Questions
Can I plug LED lights directly into a solar panel without a battery?
Only for very low-power loads and in bright sun. Most setups require a controller to regulate voltage and prevent damage. A battery or regulator is recommended for reliability.
Directly plugging LEDs into a panel is rarely recommended; use a controller or battery for safe, reliable power.
What is the safe voltage for lights in a solar-powered system?
Most off-grid LED lights operate at 12V DC or via a regulated low-voltage supply. Match your lights to the controller’s output and use a regulator if needed to prevent overvoltage.
Match light voltage to the controller’s output and use a regulator if your lights aren’t 12V DC.
Do I need a professional to install this?
Not always. Simple, low-power setups can be DIY-friendly. Seek professional help if you plan larger systems, AC mains integration, or if you’re uncertain about safety.
You can often do it yourself for small setups, but get help for larger or mains-connected systems.
How long will a battery last in this setup?
Battery life depends on usage, temperature, and type. Well-maintained batteries can provide reliable nighttime lighting for many months to years under typical conditions.
Battery life varies with use and care; with proper maintenance, you’ll get consistent lighting for a long time.
Is this solution weatherproof?
Yes. Use weatherproof enclosures, sealed connections, and outdoor-rated components. Weather exposure shortens component life if not properly protected.
Yes—weatherproof components and enclosures are essential for outdoor use.
Watch Video
Top Takeaways
- Size the setup to your lighting needs before buying gear
- Use a compatible controller and battery for reliable power
- Test under sun before full-time use to verify stability
- Inspect connections regularly for safety and efficiency