How to Fix Solar Panel Lights: A Homeowner's Guide
Learn practical steps to diagnose and repair solar panel lights, including safety checks, common causes, and component replacement. Solar Panel FAQ provides clear, science-based tips for homeowners seeking reliable night lighting.

To fix solar panel lights, start with a diagnosis: verify panel output, inspect the light fixtures, test the battery or controller, and check wiring connections. Common fixes include cleaning panels, reseating connectors, replacing damaged LEDs, and correcting charge-controller settings. Safety is critical—disconnect power before servicing, wear protective gear, and work in daylight when feasible. Also check for shade, panel angle, and seasonal battery health.
Diagnosing the Cause of Dim or No Light
Identifying why solar panel lights aren’t performing starts with a broad check of the system’s three pillars: the solar panel, the energy storage (battery), and the lighting module (LED/fixture). According to Solar Panel FAQ, many faults originate from dirt or debris on panels, loose or corroded connections, or degraded batteries. Begin with a quick visual audit: is the panel surface clean, is the mounting secure, and are there any obvious signs of damage or moisture intrusion? Next, compare live voltages with your expected numbers using a multimeter. If you measure significantly lower open-circuit voltage than the panel’s rated output under full sun, the issue is likely a panel or wiring fault. If the panel seems healthy but the battery voltage is low, the problem is storage. Finally, inspect the LED modules themselves for flicker, corrosion, or burnt components. A patient, methodical check helps you avoid unnecessary replacements and keeps your system running on clean, bright night lighting.
Safety First: Electrical and Weather Considerations
Working with solar lighting systems involves electrical currents and rooftop access. Always power down the system before touching wires or panels. Keep hands dry, wear insulated gloves, and use a non-conductive ladder on stable ground. If you operate from a roof, use a buddy system and fall protection. Never attempt repairs during rain or in wet conditions; moisture can cause shorts or electric shock. When in doubt, consult a licensed technician, especially for roof-mounted or high-voltage configurations. Solar panels produce power even in overcast conditions, so assume there could be residual energy in wiring until you’ve fully isolated the circuit.
Quick Checks You Can Do in Minutes
- Clean the panel surface with a soft cloth and mild water; dirt and grime reduce light absorption. - Inspect and reseat all connectors at the panel, battery, and fixture ends; loose or corroded contacts are common culprits. - Verify the battery voltage with a multimeter; most 12V systems should show a healthy charge in bright sunlight. - Check for shading or debris around the panel that could create hotspots and reduce output. - Inspect the fixture itself for cracks, water intrusion, or damaged LEDs; sometimes the problem is localized to one module. - Confirm the charge controller’s settings match your battery type (flooded, gel, Li-ion) and that it isn’t in a protective reset state.
Replacing Components: LEDs, Battery, Inverter/Controller
If testing reveals a defective LED module, replace only the failed segment or the entire module if compatible. For storage issues, test or replace the battery—older batteries lose capacity and efficiency over time. If the controller is misbehaving (over/under charging, incorrect shutdown thresholds), consider installing a compatible replacement or updating firmware if available. Always verify compatibility with your solar panel’s voltage and current specs. When replacing, use proper-rated connectors and ensure watertight seals to protect against corrosion. After any replacement, re-test the system under full sun and observe the fixture’s performance for several hours to confirm stability.
Step-by-Step Troubleshooting If the Light Still Won’t Come On
- Power down the system completely and disconnect the battery. 2) Reinspect all wiring for damage or corrosion; replace frayed cables or loose terminals. 3) Clean and reseat all electrical connections, then reconnect power and observe panel voltage in sun. 4) Test the LED module by swapping it with a known-good unit, if available. 5) Check the charge controller settings and reset to the manufacturer’s recommended configuration. 6) If available, test with a replacement battery and/or controller to isolate the faulty component. 7) Run a final test over a day to ensure consistent performance under varying light conditions.
Maintenance Tips to Prevent Future Failures
- Schedule seasonal cleanings of panels and fixtures to maintain maximum efficiency. - Use a simple maintenance log to track battery health, panel output, and any replacements. - Protect wiring with conduits and weatherproof seals to prevent moisture ingress. - Keep the fixture housing free from dust and vegetation that can block light output. - Consider upgrading to corrosion-resistant connectors and sealed LED modules for longer service life. A proactive approach reduces downtime and keeps your outdoor lighting reliable.
Tools & Materials
- Multimeter(Test panel voltage, battery status, and continuity)
- Screwdriver set (Phillips and flat-head)(Access junction boxes and LED modules)
- Wire cutters/strippers(Trim or expose conductors as needed)
- Electrical tape or heat shrink tubing(Insulate and seal new connections)
- Replacement LEDs or LED modules(Only if you identify a failing LED segment)
- Replacement battery (as applicable)(Choose compatible chemistry and rating)
- Cleaning supplies (soft cloth, mild soap)(Clean panels and fixtures without scratching surfaces)
- Safety gloves(Protect hands during handling and wiring)
- Ladder or rooftop access gear(Only if rooftop maintenance is planned and safe)
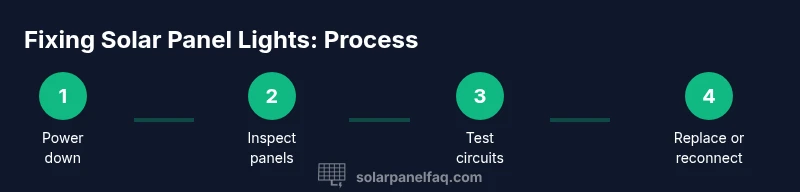
Steps
Estimated time: 45-120 minutes
- 1
Power down and secure
Fully disable the system by turning off the solar controller, disconnecting the battery, and isolating the panel from the charge controller. This eliminates the risk of shock while you inspect wiring and modules.
Tip: Use a lockout/tagout method if you have multiple occupants using the system. - 2
Inspect for obvious issues
Look for loose connectors, corrosion, damaged cables, or cracked LED modules. Replace or reseat any suspect components before testing further.
Tip: Document any disconnected wires to ensure correct reassembly. - 3
Test panel and battery health
With the multimeter, measure the panel’s voltage under sun exposure and compare to the spec. Check the battery voltage to gauge charge state and capacity.
Tip: Record voltages to identify trends over time. - 4
Clean and reseat connections
Clean contact surfaces with a soft cloth, reseat all connectors, and re-tighten screws. Ensure seals are intact to prevent moisture ingress.
Tip: Apply a small amount of dielectric grease on metal contacts if recommended by the manufacturer. - 5
Test LEDs or module
If a module is suspect, swap with a known-good unit or test with a spare LED strip if available. Verify electrical continuity after replacement.
Tip: Only replace one module at a time to easily identify faulty parts. - 6
Check controller settings
Review charge controller configuration to ensure it matches the battery type and system voltage. Reset to factory defaults if needed and reconfigure.
Tip: Refer to the owner’s manual for recommended settings. - 7
Reconnect and observe
Reconnect the system and power it up in bright sun. Observe the light fixture over several hours to confirm consistent operation.
Tip: If lights flicker, reassess connections and consider component replacement.
Frequently Asked Questions
What causes solar lights to fail?
Failures usually come from dirty panels, loose wiring, or aging batteries. Environmental exposure can degrade seals and LEDs. System misconfiguration of the charge controller also leads to undercharging or overcharging.
Common causes are dirty panels, loose wires, aging batteries, or controller misconfiguration.
Is it safe to work on rooftop solar lights?
Rooftop work carries fall and electrical hazards. Always use proper fall protection, work with a partner, and avoid wet conditions. If unsure, hire a professional.
Rooftop work can be hazardous; use protection and consider a professional if unsure.
Do I need a new battery to fix lights?
Not always. Test the battery health with a multimeter. If voltage is low or capacity is reduced, replacing the battery may restore performance.
Test the battery first; replacement may be needed if capacity is degraded.
Will cleaning panels improve light performance?
Yes. Dirt and grime reduce light absorption. Regular cleaning can significantly improve the panel’s output and overall system performance.
Cleaning panels can noticeably improve output and reliability.
When should I replace the LED module?
If an individual LED or module flickers, fails in testing, or shows visible damage, replacement is warranted. Replace with compatible parts to maintain electrical balance.
Replace a damaged or flickering LED module with a compatible part.
Watch Video
Top Takeaways
- Diagnose before replacing components to save time and money.
- Prioritize safety and proper isolation when working with solar lighting systems.
- Regular cleaning and inspection prevent most outages and extend life.
- Document maintenance to track performance over time.