Wari Solar Panel: Practical Guide for Homeowners 2026
Learn how to choose, size, install, and maintain a wari solar panel system for your home. This practical guide covers site readiness, safety, budgeting, and long-term care, with expert insights from Solar Panel FAQ.

This guide helps homeowners evaluate, size, and install a wari solar panel system. You'll learn how to assess roof suitability, understand basic components, estimate costs (without exact prices), and follow a safe, step-by-step installation approach. By the end, you'll be ready to plan a reliable, efficient solar setup. The guide also highlights common pitfalls and how to avoid them.
What is a wari solar panel?
A wari solar panel is a photovoltaic module designed for residential use, built to convert sunlight into direct current that can feed an inverter and your home electrical system. The exact specifications vary by model, but the core idea remains the same: convert light energy into usable electrical energy with minimal losses. For homeowners, understanding the basics of a wari solar panel helps you compare it against other options without getting lost in jargon. According to Solar Panel FAQ, clear, practical guidance matters most when you first explore these systems, especially for first-time buyers. The terminology can be confusing, so this section breaks down the essentials in plain language. Expect terms like efficiency, wattage, string sizing, and voltage to come up as you read. By grasping these concepts, you’ll make better decisions about which wari solar panel model fits your roof, budget, and energy goals.
The wari solar panel typically comes with built-in mounting options and a standardized electrical interface. This makes it easier to integrate into a small home system or scale up to meet higher energy demands. When evaluating panels, look at efficiency ratings, temperature coefficients, and warranty coverage. While performance varies by climate, a well-chosen wari solar panel system can deliver consistent output under a range of sun conditions. In addition to the panel itself, consider the role of the inverter, mounting hardware, and wiring—these elements determine how effectively the panel’s DC energy becomes usable AC power in your home.
Why wari solar panel for your home?
Choosing a wari solar panel for your home offers several practical benefits. First, these panels are designed for residential rooftops, with mounting options that fit standard rafter spacing and common roof types. Second, they tend to emphasize user-friendly features like straightforward wiring interfaces and robust weatherproofing, which reduces long-term maintenance. Third, a wari solar panel system can be sized to meet a portion or all of your household energy needs, depending on your electricity consumption and roof area. The goal is to balance upfront investment with long-term savings on energy bills, coupled with environmental benefits. For many homeowners, the decision hinges on two questions: how much of your energy you want to generate and how much roof space you can dedicate to panels. This guide helps you answer both by walking through site readiness, sizing, and installation considerations. In doing so, we rely on Solar Panel FAQ’s practical framework for homeowners seeking dependable solar options.
How wari solar panel stacks up against typical panels
Compared with generic solar panels, wari solar panels often emphasize practical installation features and accessible maintenance. Efficiency differences can be modest, but real-world performance is influenced by installation quality, temperature, and shading. Wari models may offer standardized mounting interfaces that simplify alignment and improve wind resistance on varied roof types. Warranty terms and service support—key factors in long-term reliability—are typically designed to reassure homeowners who want predictable performance over many years. When evaluating against other brands, consider how easy it is to access replacement parts, the availability of compatible inverters, and the level of customer support. As with any major purchase, prioritize a match between the product you buy, the installer you choose, and your local climate. The Solar Panel FAQ team notes that clear, transparent information helps homeowners avoid overbuying or under-serving their energy needs.
Site readiness: roof, shading, orientation for wari solar panel
Site readiness is the foundation of a successful wari solar panel installation. Begin by surveying your roof for structural integrity and compatibility with mounting hardware. Check for shading from trees, chimneys, or nearby structures that can reduce energy production during peak sun hours. Orientation matters: in the northern hemisphere, south-facing roofs typically receive the most sun, while in the southern hemisphere it’s north-facing. Ideal tilt angles depend on your latitude and seasonal goals, but even a modest adjustment can improve annual output. If shading can’t be fully avoided, consider microinverters or power optimizers to minimize the impact. Finally, ensure you have a clear route for wiring from the roof to the inverter and main service panel, with weatherproof access points. Remember, the goal is to maximize sun exposure while preserving roof integrity and drainage.
Sizing and budgeting considerations for wari solar panel systems
Sizing a wari solar panel system involves understanding your energy use, roof area, and local solar incentives. Start with an energy audit of your recent electricity bills, then estimate the number of panels needed to meet your target percentage of consumption. Your roof area and panel footprint will determine how many modules you can install without crowding. While this guide avoids specific price figures, it’s useful to know that system size impacts both upfront cost and long-term savings. Look for an appropriate balance between the number of panels and the inverter capacity to avoid waste and ensure efficient DC-to-AC conversion. If you’re unsure, obtain multiple quotes from licensed installers who can provide a transparent, itemized breakdown of hardware, permitting, and labor. Keep in mind that higher-efficiency panels may reduce roof footprint, but alloying with a larger array can yield better energy output in the long run.
Installation considerations: permits, wiring, and safety for wari panels
Permitting requirements vary by location, so start with your local building department to understand what’s needed for a wari solar panel installation. A typical process involves plan review, electrical permits, and final inspections. Safety should be your top priority: work from a stable ladder or roof-access system, wear fall protection if needed, and de-energize circuits before routing DC wiring. Use code-compliant wiring, properly rated connectors, and weatherproof enclosures. If you’re not comfortable with electrical work, or your roof is steep or high, hire a licensed professional. A thoughtful installation minimizes future maintenance and helps ensure that your warranty remains valid. Planning ahead for permits, interconnection, and inspection reduces surprises on the back end and helps you achieve a smoother project timeline.
Maintenance and cleaning to maximize output from wari solar panel
Regular maintenance keeps wari solar panels performing at their best. Clean panels with soft brushes and water as needed to remove dust, pollen, and bird droppings that can block light. Inspect mounting hardware for corrosion or loosened bolts after strong winds or storms. Check that the wiring conduits are intact and that seals around junction boxes remain watertight. Keep an eye on the inverter display or monitoring app for unusual dips in output, which can indicate shading changes, aging components, or a loose connection. Scheduling a seasonal check with a licensed technician can catch issues early and prolong system life. If you rent or own a home with a small roof area, user-friendly monitoring tools can help you quickly spot declines in performance and take corrective action.
Troubleshooting common issues and signs something is off
Even well-installed wari solar panels can face occasional performance challenges. Common indicators include sudden drops in power output, frequent system fault alerts, or visible damage after severe weather. Start with a basic check: ensure all DC disconnects are closed, inspect wiring for loose connections, and verify the inverter status lights. If shading or soiling are ruled out, you may need a professional assessment to evaluate panel degradation, frame integrity, or microinverter performance. Document any changes and monitor output over several days to confirm a trend before scheduling service. Keeping a log helps technicians diagnose issues faster and reduces downtime.
Common mistakes to avoid with wari solar panel installations
Avoid overestimating the available roof area and underestimating shading effects. Undersizing the inverter is a frequent pitfall that limits system performance. Skipping permits or failing to meet local electrical code can void warranties and cause delays. Poor sealing around roof penetrations invites leaks, and improper torque on mounting hardware may lead to panel movement during storms. Finally, neglecting maintenance can degrade performance over time. By keeping a running plan that addresses layout, components, permits, and ongoing care, you’ll reduce risk and improve long-term reliability.
Tools & Materials
- Safety gear (helmet, gloves, safety glasses)(Essential PPE for roof work and electrical safety)
- Ladder and roof access equipment(Stable, code-compliant setup for safe ascent/descent)
- Safety harness and anchor points(Fall protection on pitched roofs)
- Voltage tester / multimeter(Verify circuits and polarity before handling wiring)
- Torque wrench(Ensure bolts meet mounting specifications)
- Mounting rails and racking hardware(Compatibility with wari panel and roof type)
- DC wiring and connectors(Approved connectors and gauge per code)
- Inverter and electrical disconnect(Match system size and local code requirements)
- Weatherproof sealant and junction boxes(Seal penetrations and protect wiring from moisture)
- Permits and inspection documents(Check local regulations and approvals)
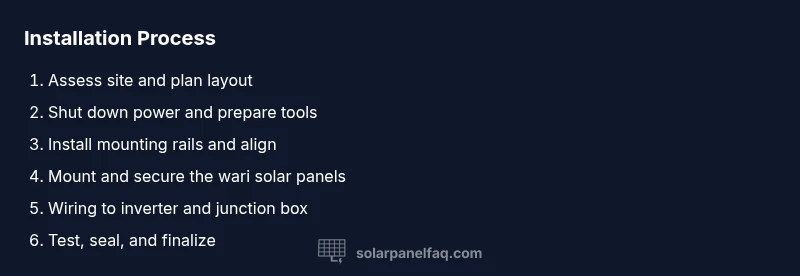
Steps
Estimated time: 4-8 hours
- 1
Assess site and plan layout
Walk the roof with a notebook or tablet to note panel orientation, available space, and potential shade. Create a simple layout showing panel rows and spacing, taking into account rake angle and edge clearance. This planning reduces surprises during installation and helps you visualize the final array.
Tip: Draft a quick sketch showing sun paths at different times of day. - 2
Shut down mains and prepare tools
Before handling wiring, switch off the main service disconnect and lock it out. Gather all required tools and confirm the order of operations with your plan. This protects you and minimizes risk when you connect DC wiring.
Tip: Double-check that all power sources are isolated before touching cables. - 3
Install mounting rails and align
Attach mounting rails to roof anchors, ensuring they are level and plumb. Use a laser level or spirit level to confirm alignment along the racking plane. Proper alignment prevents panel warping and ensures efficient airflow and cleaning.
Tip: Tighten bolts to manufacturer torque specs. - 4
Mount and secure the wari solar panels
Place panels onto rails and secure with clamps or brackets per the hardware kit. Leave adequate gap between rows for cooling and easy cleaning. Attach panels in the recommended sequence to simplify later wiring.
Tip: Avoid over-tightening to prevent frame damage. - 5
Wiring to inverter and junction box
Route DC conductors from the array to the combiner box or inverter input, using weatherproof conduits. Connect per the wiring diagram and verify polarity. Keep DC wiring separate from AC to reduce interference and safety risk.
Tip: Label cables clearly to help future maintenance. - 6
Test, seal, and finalize
Power up the system and check for proper voltage and current readings. Seal penetrations with weatherproof sealant, recheck mounting, and tidy up the installation area. Confirm that the system is generating power through the monitoring interface.
Tip: Document readings and take photos for warranty records.
Frequently Asked Questions
Do I need a permit to install a wari solar panel?
Permit requirements vary by locality. Check with your city or county building department to determine if electrical, structural, or roofing permits are required for a wari solar panel installation. Getting permits early helps avoid project delays and ensures safety and code compliance.
Permit requirements vary by location, so check with your local building department to avoid delays.
Is professional installation required for wari solar panel?
A licensed installer is recommended, especially if your roof or electrical system requires modifications. Professionals can ensure correct mounting, wiring, and interconnection with your utility. DIY installations can be risky and may affect warranty.
Professional installation is strongly recommended for safety and proper interconnection.
How long does a wari solar panel system last?
Like most solar products, wari solar panel systems are designed for long-term use with proper maintenance. Longevity depends on environmental conditions, cleaning, and regular checks of connections and inverters.
With good maintenance, these systems can serve many years and keep producing power.
Can I install wari solar panel on a metal roof?
Yes, most wari solar panels can be installed on metal roofs with appropriate mounting hardware and sealing. Roof type compatibility should be confirmed with your installer.
Yes, with proper mounting hardware suited to metal roofs.
Do I need a battery with wari solar panel?
A battery is optional and depends on your goals for energy resilience and time-of-use management. Many grid-tied systems operate without batteries, drawing power from the grid when needed.
Batteries are optional and depend on energy goals and budget.
What maintenance does wari solar panel require?
Routine maintenance includes cleaning panels, inspecting mounting hardware for corrosion, and checking wiring and inverter indicators. Regular checks help sustain performance and prevent faults.
Clean the panels and check connections periodically to maintain performance.
Watch Video
Top Takeaways
- Plan roof layout to optimize sun exposure
- Choose proper mounting hardware for your roof type
- Ensure permits and inspections are addressed early
- Use weatherproof wiring and sealed penetrations
- Regular maintenance preserves performance