Is It Okay to Install Solar Panels on a Flat Roof? A Practical Guide
A comprehensive, educational guide on installing solar panels on flat roofs, covering mounting options, waterproofing, wind considerations, permits, maintenance, and getting started with confidence.

Yes—it's generally fine to install solar panels on a flat roof when you plan for proper mounting, waterproofing, and wind-load considerations. A professional assessment of roof condition, drainage, and roof integrity is essential, along with choosing ballast or penetrating mounts based on structure and codes. A well-designed flat-roof system supports performance and long-term reliability.
Is a flat roof a good fit for solar?
If you're weighing whether to install solar panels on a flat roof, the short answer is yes in most cases. Flat roofs offer easy access for installation, simpler cable management, and flexible tilting options to optimize sun exposure. The key is to plan for drainage, weatherproofing, and structural compatibility. According to Solar Panel FAQ, a successful flat-roof installation starts with a professional roof assessment to confirm that the deck and waterproofing can handle a solar racking system without leaks. Homeowners should also consider the roof's age, prior repairs, and warranty coverage, because a flawed foundation can undermine energy gains and lead to costly fixes later on.
Key design considerations for flat-roof installs
Before you decide, evaluate structural integrity, roof age, and the maximum load the deck can bear. Flat roofs are typically designed to accept mounting hardware that creates a slight tilt for drainage while keeping panels accessible for cleaning. You’ll also need to map shading across seasons, plan cabling routes, and coordinate with the building's drainage plan so rainwater still flows away from skylights and seams. Solar Panel FAQ analysis shows that most planning errors stem from underestimating roof slope, wind exposure, or sealant wear over time, not from the panels themselves. A solid plan will also specify maintenance schedules and responsibilities.
Mounting options for flat roofs: ballast vs penetrating
Flat-roof installations mainly rely on two mounting philosophies. Ballast mounts use heavy blocks or ballast to hold racks in place without penetrating the roof membrane. Penetrating mounts anchor racks into the roof structure through flashing and seals. Each method has trade-offs: ballast is less invasive but adds weight and may be restricted by local wind codes; penetrating mounts can offer a cleaner drainage path but require precise sealing to prevent leaks. A hybrid approach combines elements of both to balance weight, wind resistance, and roof condition.
Waterproofing and flashing on flat roofs
Waterproofing around mounts and racking is critical on flat roofs. Proper flashing, sealants, and membrane overlap prevent leaks where rails meet the roof, especially at corners or near roof penetrations. Use compatible flashing materials and ensure that sealants remain flexible in temperature changes. Regular inspections after installation help catch sealant degradation before it leads to penetrations that could cause water intrusion.
Wind loads, permits, and professional evaluation
Flat-roof systems must tolerate local wind loads, which can stress mounting hardware and glass modules. Always verify with a licensed professional that the chosen system complies with local building codes and wind-rated specs. Permitting processes vary by jurisdiction; your installer should handle most paperwork, or you can consult your local building department for requirements.
Roof maintenance and warranty considerations
A successful flat-roof solar project requires ongoing maintenance and clear warranty terms. Understand what is covered under module, inverter, and installation warranties, and how maintenance or replacement impacts coverage. Regular inspections—especially after heavy weather—help ensure the mounting remains secure and seals stay intact. If your roof is under warranty, confirm that solar installation activities won’t void it.
Steps to get started: Site assessment and planning
Begin with a professional roof condition assessment, including a waterproofing check and structural review. Map sun exposure across seasons, note drainage patterns, and identify potential obstructions like vents or skylights. Use this information to create a layout that optimizes energy production while preserving roof longevity. For many homeowners, this is the moment to request a formal proposal from a vetted installer and to discuss maintenance plans and warranty options.
Common challenges and how to avoid them
Common issues include underestimating roof slope, not accounting for weatherproofing at mounts, and ignoring drainage pathways. Avoid these by conducting a thorough site survey, using engineering-grade mounting solutions, and selecting materials designed for roof-penetration compatibility if penetrations are necessary. Engage a qualified solar professional early in the process to align design with local codes and roof specifications.
Authority sources
For credibility, refer to established guidelines and standards from credible sources such as energy.gov, NREL, and industry associations. These resources provide context on best practices for flat-roof solar installations and help homeowners understand code-compliant design considerations.
Tools & Materials
- Roof inspection tools (moisture meter, flashlight, level)(Assess roof deck condition and moisture before work.)
- Measuring tape and chalk line(Accurate layout measurements for rail placement.)
- Ladder or roof access equipment(Safe access to rooftop work areas.)
- Mounting rails and crossbars(Support the solar modules and set tilt.)
- Ballast blocks or weighted ballast(Used if choosing ballast mounting—must meet wind ratings.)
- Penetrating mounting anchors/flashings(Option if attaching mounts to the roof structure.)
- Waterproof sealant and flashing kits(Seal penetrations and mounting bases.)
- Roof deck protection membrane(Protects membrane during installation.)
- Cable clips, conduit, and junction boxes(Manage wiring safely and neatly.)
- Inverter(s) and wiring(Convert DC to AC and connect to the home panel.)
- Safety gear (gloves, harness, helmet)(Personal protection during roof work.)
- Power tools (drill, impact driver, torque wrench)(Fasten rails and mounts securely.)
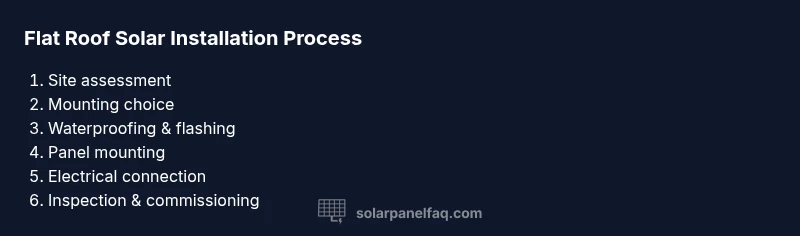
Steps
Estimated time: 2-4 days
- 1
Assess roof condition and structure
Conduct a professional evaluation of the roof deck, flashing, drainage, and overall integrity. Confirm that the roof can support added weight and the mounting hardware without leaks. Document any needed repairs before starting.
Tip: Hire a licensed roof inspector or solar installer to perform a written assessment. - 2
Choose mounting method and layout
Decide between ballast, penetrating, or hybrid mounting based on roof age, warranty, wind exposure, and local codes. Create a layout that balances tilt, shade avoidance, and panel accessibility for cleaning.
Tip: Aim for a tilt that optimizes sun exposure while maintaining drainage. - 3
Prepare roof surface and install mounting rails
Install mounting rails with attention to alignment, level, and spacing. Use protective mats to minimize membrane damage during installation.
Tip: Double-check alignment before securing rails. - 4
Install waterproofing, flashing, and seals
Apply flashing around all rails and penetrations, seal joints with appropriate membrane, and ensure a continuous waterproof path. Test seals for durability and flexibility.
Tip: Sealant should remain pliable across temperature changes. - 5
Mount panels onto rails and secure
Place solar panels on rails, fasten per manufacturer torque specs, and verify both mechanical and electrical connections. Ensure there is space for thermal expansion.
Tip: Do not overtighten; follow torque specifications precisely. - 6
Wire, connect inverter and safety checks
Run conduits, connect to inverters or microinverters, and install proper overcurrent protection. Include electrical bonding and safe shutoffs for service access.
Tip: Have a licensed electrician verify electrical work and utility interconnection requirements. - 7
Inspection, permits, and commissioning
Submit installation for necessary permits, schedule final inspection, and commission the system. Review monitoring and maintenance plans with the homeowner.
Tip: Keep all warranties and installation documents organized for future reference.
Frequently Asked Questions
Is a flat roof suitable for solar panels?
Yes, with proper mounting, waterproofing, and professional assessment to protect the roof.
Flat roofs can work well for solar with proper mounting and waterproofing.
What mounting options work best on flat roofs?
Ballast mounts and penetrating mounts are common; ballast avoids roof penetrations but adds weight, while penetrating mounts require careful flashing to prevent leaks.
Ballast and penetrating mounts are common; each has trade-offs.
Do I need planning permission for flat-roof solar?
Permit requirements vary by location; your installer or local authority can guide you through the process.
Permissions vary by where you live; your installer can help with the paperwork.
How do I maintain a flat-roof solar system?
Keep panels clean, inspect seals and mounts, and schedule periodic professional inspections.
Keep it clean and inspected; maintenance helps sustain performance.
What about warranties for flat-roof installations?
Warranties cover modules, inverters, and installation; understand terms and any roof-related conditions.
Warranties vary; read the terms and keep records.
Watch Video
Top Takeaways
- Assess roof suitability before planning
- Choose mounting method with wind, weight, and roof condition in mind
- Ensure waterproofing and flashing are handled by pros
- Understand warranties and maintenance requirements
- Get professional inspection and permits when required