Free Solar Panel Registration Online: A Homeowner's Guide
Learn how to register your solar panel installation online for free in your area. This practical guide explains where to register, what documents you need, and how to avoid common pitfalls in 2026.

Registering your solar panel installation online is often the first step toward interconnection and permits. In many jurisdictions the registration itself can be free, but related permits or inspections may carry fees. This quick guide shows you where to register, what documents you’ll need, and how to verify you’re using an official portal. According to Solar Panel FAQ, the process varies by jurisdiction, so always check your local rules first.
What 'Free Solar Panel Registration Online' Typically Covers
In many jurisdictions, online registration for a solar installation is the initial step toward ensuring your system can be interconnected and inspected properly. The phrase "free solar panel registration online" often refers to submitting basic project details through an official government or utility portal at no charge. However, some components of the overall process—such as site inspections, electrical permits, interconnection reviews, or meter changes—may incur fees. According to Solar Panel FAQ, the distinction between registration and the broader permitting workflow is critical to understanding total cost. This section clarifies what you should expect to complete online, what documentation is optional, and what is mandatory for a smooth start to your solar journey in 2026.
How Registration Differs by Jurisdiction
Registration requirements and portals vary by country, state, province, or utility district. Some regions offer a streamlined, fully online process for basic installation data, while others require in-person visits or additional forms. Always use official portals with government or utility domains to minimize risk and protect sensitive information. The Solar Panel FAQ team emphasizes verifying that the portal is legitimate and that you’re submitting to the correct jurisdiction. If you move to a new area, re-check the process, as the timelines and required documents can change significantly.
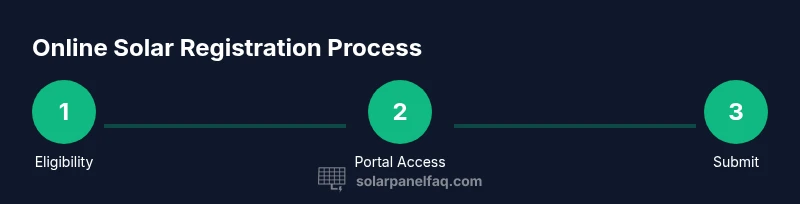
Step-by-Step Registration Overview (Non-Clinical)
A high-level overview helps homeowners prepare without getting bogged down in jurisdictional quirks. Start by confirming eligibility, locating the official online portal, creating an account (if required), and gathering installation details such as address and system size. You will typically upload documents, review a summary of inputs for accuracy, and submit the registration. After submission, you’ll receive a reference number and status updates. Expect a potential review period, during which authorities may request more documents. Staying organized minimizes delays and supports a faster path to interconnection.
Documents You'll Likely Need
Most online registrations request a consistent set of documents to verify ownership and the installation plan. Common items include a government-issued ID, proof of property ownership or lease agreement, technical specifications of the solar system (size, model, and components), installation address, utility account details, and any permits already issued locally. Some portals allow you to upload documents later; others require everything upfront. For any item that isn’t obvious, consult the official checklist linked in the online portal summary.
Fees, Subsidies, and What 'Free' Really Means
Even when the registration submission itself is free, there may be separate charges for related steps such as building permits, electrical inspections, or interconnection studies. Some regions offer subsidies or expedited processing that reduce total costs or waive certain fees for homeowners adopting solar energy. The distinction between a fee-free registration and a fee-free project is important—ask the official portal for a fee schedule and timelines for your specific jurisdiction. The long-term value of a solar installation can still be substantial even when minor costs apply.
Navigating the Online Portal: A Practical Walkthrough
Entering the online portal can feel daunting if you’re not sure what to expect. Look for a clearly labeled section like 'New Registration' or 'Net Metering/Interconnection.' You’ll typically create an account, verify your email, and begin a form that collects installation details, system size, location, and interconnection preferences. Use a desktop browser for reliability and enable two-factor authentication when offered. Save any confirmation numbers as you proceed; you may need them for status updates or future amendments.
How to Ensure Your Registration Is Valid
Validation hinges on accuracy and completeness. Double-check the installation address, system capacity (in kilowatts), proposed interconnection point, and contact information. After submission you should receive a confirmation email or onscreen receipt with a reference number. If the portal flags missing items, supply them promptly. In some jurisdictions, you can edit inputs before approval; after submission, contact support if you notice errors. Keeping copies of all documents and confirmations helps you resolve disputes quickly.
Common Roadblocks and How to Solve Them
Expect occasional friction: slow portals, unclear instructions, or ambiguous document requirements. If you encounter a rejected submission, read the rejection notice carefully and compare it to the official checklist. If you can’t upload a required file, try a different file format or size, or contact support for an alternate method. Phishing attempts can mimic portals—verify the site domain and never share credentials outside the official portal. Staying proactive reduces delays and increases the likelihood of a smooth process.
After You Register: What Comes Next
Registration is often the gateway to permits, interconnection requests, and grid readiness checks. After submitting online, expect a processing window that can vary by jurisdiction. You may be asked for additional documentation or to schedule inspections. Your status updates will typically appear in the portal. If approvals are granted, you’ll receive instructions for the next steps, including permitting, utility interconnection, and potential system activation timelines.
Real-World Scenarios by Region
In some regions, homeowners can complete free solar panel registration online within minutes if the project is straightforward and involves no structural changes. In others, jurisdictions require detailed site assessments and multiple document uploads, extending the timeframe considerably. When planning, factor in local holidays, reviewer workloads, and the possibility of additional requests. The goal remains consistent: establish a record of your installation in the official system to ensure safety, compliance, and reliable interconnection.
Safety, Security, and Privacy Considerations
Online registration involves sensitive personal and property information. Use devices you control and up-to-date browsers with security features enabled. Never email full documents or credentials; use portal uploads or encrypted transmission. Beware of scam sites that imitate official portals; always verify the URL and look for HTTPS indicators. As a homeowner, you have the right to request data handling policies and understand how your information is used in the registration and interconnection process.
Additional Resources for Homeowners
To deepen understanding, consult official guidance from government and energy agencies, as well as recognized solar energy centers. Look for national or regional portals that outline the interconnection standards and permit requirements. For general background, refer to credible sources such as the U.S. Department of Energy and the National Renewable Energy Laboratory. These resources can help you navigate your local process and understand how online registration fits into the broader solar journey.
Tools & Materials
- Reliable internet connection(Broadband recommended; stable connection to avoid timeouts during form submission)
- Government-issued photo ID(Driver’s license, passport, or national ID; needed for identity verification)
- Proof of property ownership or lease(Deed, lease agreement, or authorization letter from the property owner)
- Installation details(Address, utility service details, system size (kW), and panel type)
- Utility account information(Account number or service ID for interconnection tracking)
- Digital copies of documents(Scans or clear photos of IDs, permits, and plans; saved as PDF or PNG)
- Optional: printer and scanner(Helpful for hard copies if the portal supports scans or needs signatures)
Steps
Estimated time: 45-75 minutes
- 1
Verify eligibility
Confirm your jurisdiction supports online registration and whether the project qualifies as a standard installation. This minimizes back-and-forth and delays caused by incompatible rules.
Tip: Check the official portal's eligibility criteria before starting to save time. - 2
Find the official portal
Locate the government or utility portal dedicated to solar interconnection or permitting. Bookmark the site to avoid phishing copies and ensure you’re in the correct jurisdiction.
Tip: Only use links from official government or utility domains. - 3
Create or sign in to an account
Set up a secure account if required and enable two-factor authentication. This keeps your registration and personal data protected during submission.
Tip: Use a unique password and store recovery details securely. - 4
Prepare installation details
Gather installation address, system size in kilowatts, panel type, mounting method, and interconnection preference. Accurate data reduces follow-up requests.
Tip: Have a rough system layout ready to expedite form filling. - 5
Fill out the online form
Enter the project information exact as it appears on plans and permits. Review each field for accuracy before submission.
Tip: Use the portal’s saved checklist feature if available to track inputs. - 6
Upload required documents
Attach IDs, proof of ownership, and any permits or technical specs. Ensure file sizes and formats meet portal requirements.
Tip: If a file fails to upload, try another format or reduce resolution. - 7
Submit registration and note the reference
Submit the form and record the confirmation number or reference. This number will be essential for status checks or amendments.
Tip: Take a screenshot of the confirmation screen for quick access. - 8
Monitor status and respond
Watch for status updates and any requests for additional information. Respond promptly to prevent processing delays.
Tip: Set up portal notifications and check email spam folders for alerts.
Frequently Asked Questions
Is online solar panel registration truly free in every region?
Not always. Registration itself is often free, but related permits, inspections, or interconnection reviews may carry fees. Always check the official portal for a complete fee schedule.
Registration can be free, but related permits may cost money. Check your local portal for fees.
What documents do I typically need to register online?
Most portals require a government ID, proof of property ownership or lease, installation details (address, system size), utility account information, and any permits already issued. Check the portal's checklist.
You'll usually need ID, ownership proof, installation details, and utility info.
How long does online registration usually take?
Time varies by jurisdiction. A simple submission can take 15-60 minutes, while complex projects may require longer and additional documentation.
Timing varies; plan from minutes to longer if extra documents are needed.
Can I edit my registration after submission?
Many portals allow edits before approval. If you need changes after submission, contact support or use the portal's update feature where available.
You can usually edit before approval; contact support for changes after submission.
What happens after I register online?
You’ll receive a confirmation and may be asked for additional documents. Next, permits, interconnection review, and inspections may follow, depending on local rules.
You get a confirmation, then possible permits and interconnection steps.
Watch Video
Top Takeaways
- Know what online registration covers before you start
- Use official portals to avoid scams and errors
- Keep a secure record of confirmations and documents
- Expect some jurisdictions to charge for related steps; registration itself may be free